











A retractable banner stand can be ready in less than a minute, but only when the graphic, support pole, and base are handled in the right order. For a trade show booth, storefront promotion, open house, or corporate event, proper retractable banner assembly prevents crooked graphics, damaged edges, and the last-minute scramble that happens when display hardware will not cooperate.
These stands are designed for speed. The printed banner stores inside the base, rolls up with spring tension, and locks into place when pulled up and attached to the support pole. That simple design is also why careful handling matters. Pulling too quickly, forcing a pole section, or packing the stand with a loose graphic can create problems that are avoidable on a busy event day.
What Comes With a Retractable Banner Stand
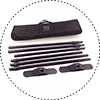
Most retractable banner systems include three main components: the aluminum base with the printed graphic installed inside, a segmented or telescoping support pole, and a padded carrying case. Premium units may also include adjustable feet, a wider base, reinforced pole connections, or a protective top rail.
Before leaving for an event, open the case and confirm that the pole is present. The base and graphic can be replaced more easily than a missing support pole at a venue. If your display uses a telescoping pole, check that its locking mechanism is working and that each section moves freely.
The graphic itself is usually attached to a top rail. This rail is the piece you hold while raising the banner. Avoid pulling directly on the printed material, especially near the corners. Even durable banner media can crease or stretch if it is repeatedly handled by the edges.
Retractable Banner Assembly: The Correct Order
Set up the stand on a flat, clear surface with enough room to extend the graphic fully. A level floor is best, but trade show halls, sidewalks, retail spaces, and event venues are not always perfect. A stable base and properly extended pole will do most of the work.
1. Place the base on the floor with the graphic opening facing the direction your audience will see. If the stand has swing-out feet, rotate them fully outward before raising the banner.
2. Assemble the support pole. For a segmented pole, connect the sections until they are secure. For a telescoping pole, extend it to the required height and lock each section in place.
3. Insert the bottom of the pole into the hole or channel at the rear of the base. It should sit upright without being forced.
4. Hold the top rail with one hand and pull the banner straight upward at a steady pace. Keep the graphic centered as it comes out of the base.
5. Attach the top rail to the hook, notch, or cap at the top of the support pole. Make sure the rail is fully seated before letting go.
6. Step back and inspect the display from the front. Check that the graphic is square, the message is readable, and the base is stable.
The most common assembly mistake is attaching the graphic before the pole is secure. That leaves the spring-loaded banner under tension while you try to position the hardware. Build the support first, then raise the graphic once.
Set Up on Carpet, Concrete, or Outdoor Surfaces
Indoor carpet is generally straightforward, though thick carpet can make a narrow base lean slightly. Press the base down gently and make sure the feet are deployed. On concrete or tile, keep the base away from door swings, foot traffic, and areas where a rolling case could hit it.
Standard retractable stands are primarily indoor displays. If an event is outdoors, wind is the deciding factor. Even a light gust can lift or tip a tall banner stand. Use a display product made for outdoor conditions when possible, or place retractable banners inside a tent, lobby, covered entrance, or other protected location. Adding makeshift weights to a standard base is not a reliable substitute for outdoor-rated hardware.
How to Keep the Graphic Straight and Clean
A banner that leans, waves, or shows wrinkles can make a strong design look unfinished. Start by checking the pole. If a telescoping pole is not fully extended or has a loose lock, the graphic may sag. If a segmented pole is not fully connected, the top rail may sit at an angle.
Next, look at the floor. An uneven surface can make the base appear crooked even when the banner is properly assembled. Repositioning the stand by a few inches often fixes the visual issue. On models with adjustable feet, use those feet to level the base instead of twisting the pole or pulling the top rail sideways.
Keep hands off the print face as much as possible. Fingerprints are especially visible on smooth, light-colored graphics. If dust or a smudge appears, use a soft dry microfiber cloth and wipe lightly. Do not use harsh cleaners, paper towels, or adhesive tape on the printed surface.
For repeated use, roll the banner into the base after every event rather than storing it extended or loosely rolled. The internal roller protects the print and helps the material retain its shape. A banner left out in a hot vehicle, damp storage room, or direct sunlight for extended periods may curl or discolor over time.
Breaking Down the Stand Without Damaging It
Taking down a retractable banner requires the same control as setup. Hold the top rail firmly, lift it off the support pole, and guide the graphic down slowly. Do not let it snap back into the base. The internal spring is designed to retract the banner, but an uncontrolled return can damage the top rail, stress the graphic, or pinch fingers.
Once the graphic is fully retracted, remove the pole from the base. Collapse a telescoping pole carefully or separate the pole sections, then place the hardware in its carrying case. Make sure the case zipper closes without pressing hard against the base or pole. If the case is too tight, check whether a pole section is sitting in the wrong position.
For teams handling several displays, label each case with the event name, graphic size, or department. A 33-inch retractable banner stand may look similar to a wider presentation stand from the outside, but the graphics and poles are not always interchangeable.
Quick Fixes for Common Banner Stand Problems
If the banner will not stay extended, do not pull harder. The top rail may not be connected securely to the pole, or the pole may be too short. Check both before assuming the spring mechanism has failed.
If the graphic rolls back unevenly, pull it out again slowly and keep the top rail level while guiding it back into the base. A slight side-to-side pull can cause the material to track unevenly. If the banner is badly misaligned, stop using force. Continued use can crease the print or damage the roller.
If the stand tips forward, verify that the base is facing the correct direction and that any stabilizing feet are opened. The support pole belongs behind the graphic, not in front of it. For a high-traffic event, position the display where people will not brush past the base or catch the top edge with bags and coats.
A bent top rail, weak spring, cracked base, or torn graphic usually calls for replacement hardware or a new print. Trying to repair a retractable mechanism at the venue can cost more time than it saves, especially before a client meeting, exhibit opening, or retail promotion.
Plan Assembly Into Your Event Setup Time
Retractable banners are fast, but they should not be the final item you open five minutes before doors open. Build them into the display setup sequence after tables, backdrops, and larger structures are in place. That keeps the banner visible while preventing it from being knocked over during heavier installation work.
For New York City events, allow extra time for elevator access, loading restrictions, security check-in, and moving equipment through busy venues. A padded carrying case makes the stand easier to transport, but it does not eliminate the need to plan for stairs, sidewalks, and tight loading areas.
Print Banners NYC can help match the banner stand format to the job, whether you need a compact display for a sales meeting or a wider visual for a trade show booth. The right hardware, a properly sized graphic, and a quick assembly check give your message the clean, event-ready presentation it needs when people start walking in.